
TL;DR
Placing your rig in a closet can drastically reduce noise and reflections if done right. Focus on sealing gaps, treating reflection points, and ensuring proper ventilation. Foam alone isn’t enough—consider barriers, placement, and airflow for best results.
If your home setup sounds like a tin can or a wind tunnel, you’re not alone. Many creators squeeze their rigs into closets, hoping to silence the noise and improve sound quality. But a tiny space can turn into a sonic nightmare—standing waves, low-end boom, and echo.
This guide reveals how to turn a small closet into a quiet, professional-sounding booth. You might find additional tips on acoustic dampening and placement helpful. Whether you want to record voice-overs, podcasts, or just keep your noise to yourself, understanding placement and dampening makes all the difference. We’ll cover practical tricks, materials, and the one secret that beats all: *where* you put your gear matters more than what you put around it.
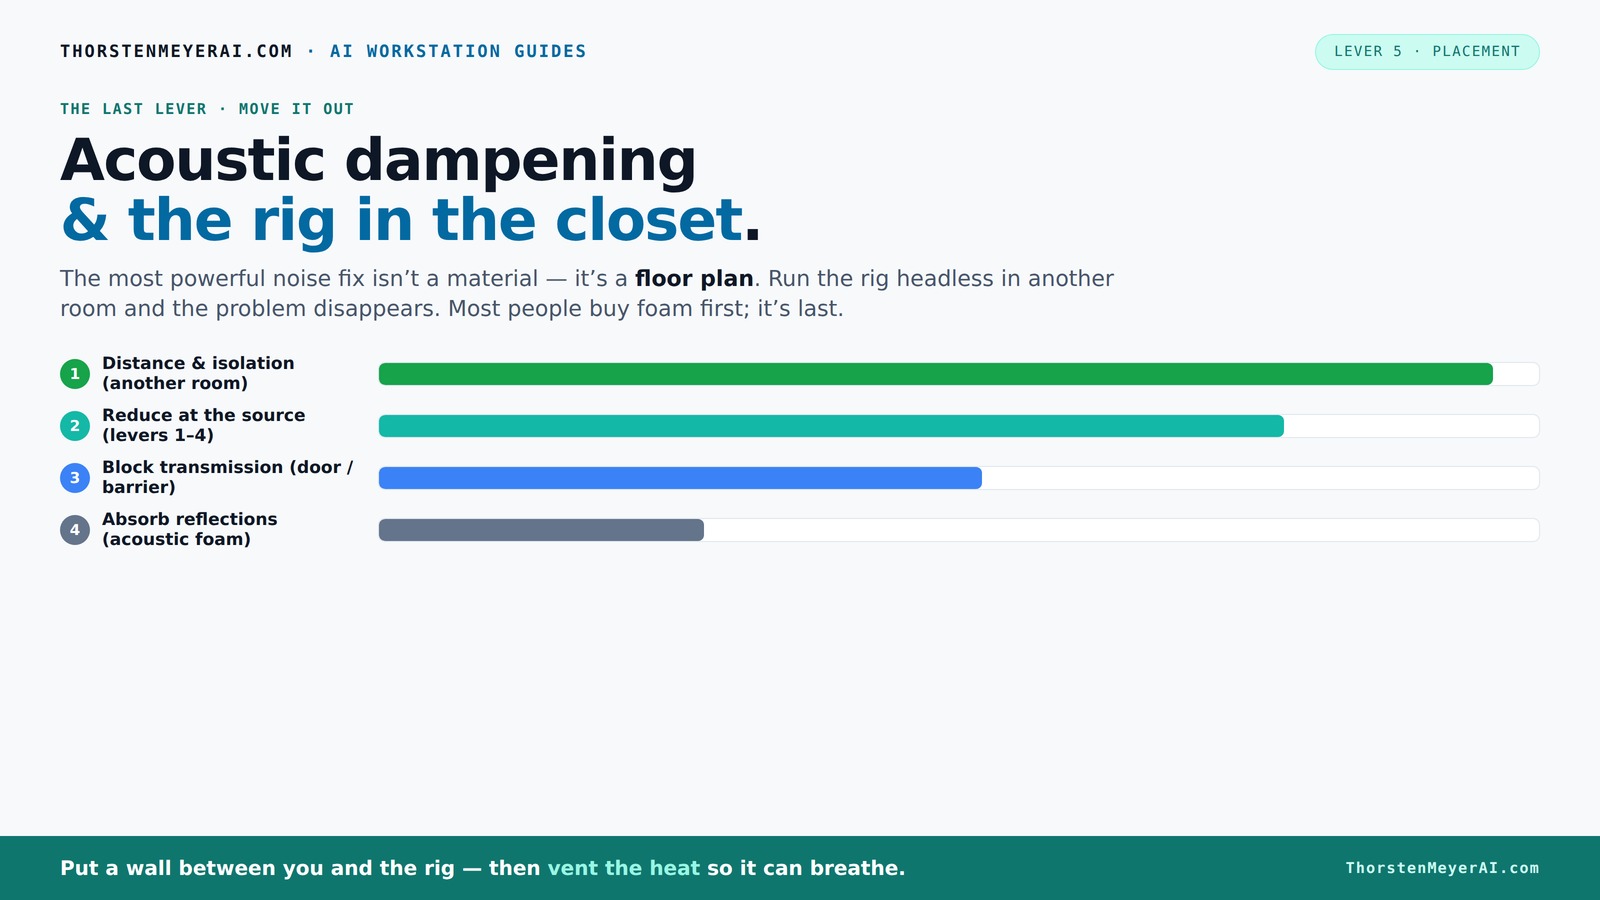
Acoustic dampening
& the rig in the closet.
The most powerful noise fix isn’t a material — it’s a floor plan. A rig you can’t hear because it’s in another room beats any amount of foam. Tap the approaches in Part 1 to see what actually works.
(another room)
(levers 1–4)
(door / barrier)
(acoustic foam)
Contain the noise, not the heat
Key Takeaways
- Sealing gaps and blocking leaks beats adding foam when it comes to soundproofing a closet.
- Placement of the mic and treatment points influences sound clarity more than coverage alone.
- Ventilation is critical—without proper airflow, heat builds up, causing noise and potential damage.
- Small, parallel-walled closets can develop resonances; fixing this needs bass traps and diffusion.
- A combination of barriers, absorption, and strategic placement creates a clean, quiet sound environment.

24 Pack Black 12 x 12 x 2 Inches Pyramid Designed Acoustic Foam Panels, Sound Proof Foam Panels for Walls, High Density and Flame-Retardant Acoustic Panels, Sound Panels for Recording and Home Studio
Exceptional Sound Absorption:These pyramid acoustic panels are engineered to effectively absorb sound waves, reducing echo and reverberation. With...
As an affiliate, we earn on qualifying purchases.
As an affiliate, we earn on qualifying purchases.
Why a Closet Can Be Your Secret Soundproof Weapon
Think a closet is just a tiny box? Think again. Its small, enclosed nature makes it an excellent space to contain sound because it limits how far sound waves can travel and bounce around. When you place your rig inside, most of the sound generated is trapped or absorbed, preventing it from leaking into the rest of your home. This containment reduces external noise interference and prevents your voice from disturbing others.
For voice work, this is gold because it creates a naturally dead space that minimizes room echo and reverb. However, if the space isn’t treated properly—if there are gaps, hard surfaces, or reflective angles—the sound can become muddy and boxy. The key advantage of a closet is that it’s a controlled environment, but only if you manage the reflections and leaks effectively.
Imagine you’re doing voice-overs in an attic closet. Without treatment, the sound may be muffled or overly resonant. But with proper placement and dampening, you get a tight, warm, and focused sound. That’s the power of turning a small closet into a makeshift vocal booth—when you understand its acoustic potential and pitfalls.

Focusound 52 Pack Acoustic Foam Panels 1" x 12" x 12" Sound Proof Foam Panles Soundproofing Noise Cancelling Wedge Panels for Home Office Recoding Studio with 300PCS Double-Side Adhesive
Soundproofing - Acoustic foam panels triangular grooves structure for better noise absorption, helps to reduce and absorb unwanted...
As an affiliate, we earn on qualifying purchases.
As an affiliate, we earn on qualifying purchases.
The #1 Thing You Can Do: Place & Seal Like a Pro
Before investing in foam panels or expensive treatments, focus on strategic placement and sealing any gaps. Cracks, vents, and door leaks are the primary sources of sound escape in a small closet. These leaks allow noise to leak out and external sound to enter, reducing your recording quality. Sealing them with weatherstripping, acoustic sealant, or draft stoppers ensures that sound stays contained.
Adding a thick rug on the floor isn’t just for aesthetics; it absorbs footstep noise and minimizes bounce-back from the floor. Cover cracks around the door with a moving blanket or DIY sound barrier—these are simple steps that drastically cut down noise transmission. The importance of sealing is often underestimated; even small gaps can significantly compromise your soundproofing efforts.
Remember: the main reflection points aren’t just the walls. The ceiling above the mic, the wall behind it, and any nearby hard surfaces are critical. Treat these first because sound tends to bounce from these surfaces, creating echo and muddiness. Proper placement of absorption materials at these points shortens reverb time and clarifies your recordings. This approach maximizes the effectiveness of your dampening efforts without needing extensive material coverage.

Audimute Soundproofing Acoustic Door Seal Kit - Door Sweep and Seal - (Large Size)
Includes (2) Door Seals (3/16" x 1/2" x 50') and (1) Door Sweep (1/2" x 1.5" x 25').
As an affiliate, we earn on qualifying purchases.
As an affiliate, we earn on qualifying purchases.
Materials That Make Your Closet Soundproof & Sound-Absorbent
Choosing the right materials is essential for balancing soundproofing and absorption. Acoustic panels, blankets, and foam are common, but their effectiveness depends heavily on strategic placement. For example, placing foam directly behind the mic or on the ceiling targets reflection points that cause echo and muddiness. Heavy blankets or quilts can be draped over walls or the door to absorb sound and prevent it from bouncing around.
Here’s a quick list of effective materials and their roles:
- Acoustic foam panels: Reduce reflections and echo, especially when placed at reflection points.
- Heavy moving blankets or quilts: Absorb sound and block leaks, easy to hang or drape.
- Rugs or carpets: Dampen footstep noise and reduce bounce from the floor.
- Weatherstripping for gaps: Seal cracks around doors and vents to prevent sound leaks.
- Bass traps: Tackle low-end resonance and standing waves that can cause muddiness or boomy recordings.
For more serious soundproofing, consider adding mass-loaded vinyl or drywall to increase the barrier effect. These materials significantly increase the mass of the enclosure, making it harder for sound to pass through. Mounting foam or panels with command strips or pushpins allows you to avoid permanent damage and make adjustments easily. The goal is to create a layered approach—absorption to tame reflections, barriers to block leaks, and strategic placement to optimize effectiveness.

Portable Recording Booth, Foldable with Travel Bag for Echo-Free Studio-Quality Sound, Complete Home Recording Studio Soundproof Vocal Booth Ideal for Voiceovers, Podcasts and Music
Our portable soundproof booth adapts to various settings, from compact home studios to larger spaces. It's perfect for...
As an affiliate, we earn on qualifying purchases.
As an affiliate, we earn on qualifying purchases.
Mic & Room Placement: How to Get Clear, Focused Sound
Placement is the foundation of good sound. Position your microphone so it faces away from reflective surfaces like walls or windows and directly toward the sound source. The main reflection point is often the wall behind the mic—treating that area reduces echo and muddiness. Keep the mic close—about 6 to 12 inches—to capture a direct, intimate sound while minimizing room noise.
Use a pop filter to reduce plosive sounds and experiment with the mic’s angle and distance to find the spot with the least echo. The shape and size of your closet influence how sound behaves; small, parallel walls can cause standing waves, which create peaks and dips in frequency response. Slightly angling panels or adding irregular surfaces helps diffuse sound and breaks up these resonances, resulting in clearer, more natural recordings.
Understanding the room’s acoustic behavior and adjusting placement accordingly can turn a boxy, echo-prone space into a professional-sounding environment. The goal is to find a sweet spot where reflections are minimized and the direct sound is prominent.
Why Foam Alone Won't Save Your Sound — When You Need More
While foam panels are effective at reducing internal reflections and echo, they do little to prevent sound from leaking through doors, vents, or cracks. If your closet door leaks noise, foam alone won’t contain it; sound will still escape or enter through gaps. This limitation is crucial because many creators mistakenly rely solely on foam, assuming it’s enough for soundproofing.
For serious noise isolation, you need a layered approach: combine foam with mass-loaded barriers like vinyl or drywall, and ensure all gaps are sealed tightly. This combination creates a more effective barrier—foam absorbs internal reflections, while barriers prevent sound from leaking in or out. The tradeoff is increased complexity and cost, but the result is a much quieter environment suitable for professional-quality recordings. Think of foam as the finishing touch—used after sealing gaps and adding barriers—to tame residual echo and reverb, not as the primary soundproofing solution.
Handling the ‘Boxy’ Sound: How to Fix Standing Waves & Low-End Booms
Small, enclosed spaces like closets often develop a boxy, boomy sound due to standing waves—resonances that cause certain frequencies to amplify and others to cancel out. These resonances are caused by sound waves bouncing between parallel surfaces, creating peaks and dips in the frequency response. The result is a muddy or muffled recording that lacks clarity.
The solution involves breaking up these reflections and resonances. Bass traps placed in corners absorb low-frequency buildup, preventing it from dominating your sound. Adding irregular surfaces or diffusers scatters sound waves, reducing the intensity of standing waves. Avoid placing the mic directly in the center of the space; instead, position it slightly off-center to minimize the impact of resonant modes.
For example, installing a bass trap in the upper corner where the ceiling meets the wall can reduce low-end resonance by up to 50%. Small tweaks—such as angling panels or adding a few diffusers—can turn a muffled, muddy sound into crisp, clear vocals, making your recordings sound more professional and natural.
Ventilation & Heat: Keeping Your Closet Rig Cool & Quiet
Moving a powerful computer or audio interface into a closet is smart for noise reduction, but it introduces the challenge of heat buildup. Without proper airflow, your equipment can overheat, leading to noise from fans or even thermal throttling, which reduces performance. The key is balancing cooling with noise control.
Passive vents or a quiet exhaust fan can help circulate air without introducing significant noise. For example, a small computer fan designed for quiet operation—around 20 dB—can exhaust hot air while remaining unobtrusive. Ducted airflow systems or an all-in-one (AIO) liquid cooler with exhaust pipes are more advanced solutions, efficiently removing heat without adding noise.
Regularly monitor your ambient temperature; if it exceeds 80°F (27°C), you risk overheating and performance issues. Adequate ventilation not only keeps your gear cool but also prevents noise caused by fans ramping up to high speeds, ensuring your setup remains both quiet and reliable.
Final Setup Checklist: Your Roadmap to a Quiet, Effective Closet Rig
Follow this step-by-step checklist to transform your closet into a professional-quality recording environment:
- Seal all cracks, gaps, and vents with weatherstripping and acoustic sealant to prevent leaks.
- Place absorption materials—such as foam panels or blankets—at reflection points: behind the mic, on the ceiling, and on nearby walls.
- Add a thick rug or carpet on the floor to absorb footsteps and bounce.
- Mount foam panels or blankets on the door to reduce leakage and external noise entry.
- Ensure proper ventilation by installing a quiet exhaust fan or passive vents to prevent heat buildup.
- Position your mic carefully—test different angles and distances to find the least reflective spot.
- Use bass traps in corners if you notice low-end boom or resonance issues.
This routine maximizes your small space’s potential, turning it into a clean, quiet, and professional-sounding booth suitable for voice, podcasting, or music recording.
Frequently Asked Questions
Does acoustic foam soundproof a closet?
Acoustic foam mainly reduces reflections and echo inside a space, but it doesn’t block sound from leaking out. For true soundproofing, you need barriers and sealing, not just foam.Where should I place panels in a closet vocal booth?
Focus on the wall behind your mic, the ceiling directly above, and any hard surfaces near the mic. These are reflection points that cause echo and muddiness.Should the mic face the treated wall or the open door?
Point the mic away from the door and toward the sound source. Treat the wall behind the mic to reduce reflections, and keep the door covered when recording.How much treatment do I need for a small closet?
Cover reflection points with foam or blankets, seal cracks, add a rug, and consider bass traps if there's low-end buildup. Less is more—target the main reflection points first.Do I need bass traps in a closet?
Yes, if you notice a boomy or muddy sound. Bass traps help tame low-end resonance caused by small, parallel walls.Conclusion
In the end, a closet isn’t just a tiny room—it’s a tool. When you control leaks, treat reflection points, and keep it cool, that small space becomes a powerhouse for clear, quiet recordings.
Remember: where you put your gear and what you surround it with matters more than expensive foam or fancy panels. Think like a sound engineer—be strategic, be flexible, and your closet can sound like a pro studio.